Hummingbird Feeders: The Complete Guide [2026]
The Ultimate Guide to Hummingbird Feeders [2026]
There are approximately 15 species of hummingbirds that regularly visit feeders across the United States, and every single one of them will ignore your feeder if you make the mistakes most beginners make. Not because hummingbirds are difficult. Not because your yard is wrong. But because hummingbird feeding has a surprisingly short list of non-negotiable requirements that nobody bothers to explain clearly before you spend money.
This guide exists because that information gap is expensive. The learning curve for hummingbird feeding is real — real enough that the wrong start costs most people between $60 and $150 in unnecessary products and failed attempts before anything clicks. The right start costs about $50 total and works immediately.
What follows is everything you actually need to know about hummingbird feeders in 2025: which feeders work and why, the nectar recipe that outperforms every commercial product on the market, placement principles that double your visitation rates, and the maintenance schedule that keeps hummingbirds returning year after year. No filler. No recommendations designed around affiliate commissions rather than actual performance. Just the information that makes the difference between an empty feeder and a yard that hummingbirds treat as essential territory.
Key Takeaways
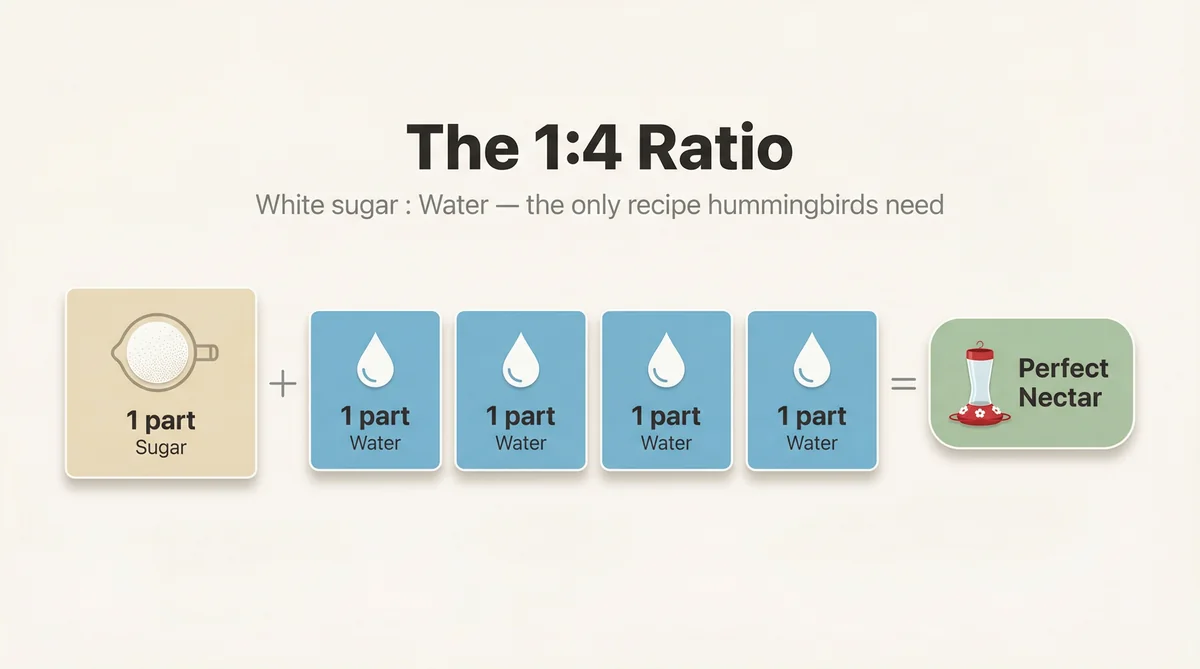
- Use a 1:4 sugar-to-water homemade nectar recipe — it outperforms all commercial nectars and costs about $4/month vs. $47/month for commercial alternatives
- Saucer-style feeders are easier to clean thoroughly than bottle-style feeders, making them the better choice for maintaining nectar freshness and hummingbird health
- Place feeders 4-5 feet high, in partial shade, within 10-15 feet of cover, and either within 3 feet or more than 10 feet from windows to prevent fatal bird strikes
- Change nectar every 3-5 days normally, every 2-3 days above 75°F, and daily during heat waves above 90°F — fermented nectar can cause fatal fungal infections
- A multi-feeder setup with feeders spaced at least 20 feet apart and out of each other's sight lines defeats territorial dominance and substantially increases total hummingbird traffic
Understanding Hummingbirds Before You Buy Anything
The single most valuable thing you can do before purchasing a feeder is spend ten minutes understanding what hummingbirds actually need. Their biology drives every practical decision you'll make.
The Metabolism That Changes Everything
A hummingbird's heart beats up to 1,260 times per minute. Their wings beat 50 to 80 times per second. To sustain that metabolic rate, they consume approximately half their body weight in sugar every single day — and they must feed every 10 to 15 minutes throughout daylight hours to avoid dangerous energy deficits.
This isn't a bird that grazes occasionally. This is a creature running a biological engine so demanding that a single cold night without adequate fuel reserves can be fatal. At night, hummingbirds enter a state called torpor — dropping their heart rate and body temperature dramatically to survive until morning. It's an extraordinary adaptation, but it only works if they've consumed enough sugar during the day to survive the drop.
Understanding this changes how you think about feeders. A feeder that's inconvenient to access, filled with poor-quality nectar, or placed in a location that feels unsafe isn't just suboptimal — it's a resource hummingbirds will abandon entirely in favor of better options. They don't have the energy budget to waste on marginal food sources.
Color Vision and the Red Question
Hummingbirds have excellent color vision and are strongly attracted to red. This is why most feeders come in red, why some commercial nectars are dyed red, and why generations of backyard birders have planted red flowers near their feeders. The color attraction is real and well-documented.
What it doesn't mean: you need red-dyed nectar. The feeder itself provides the color signal. Red dyes in commercial nectar — particularly Red Dye No. 40 — have raised enough concern about potential kidney damage in hummingbirds that most serious birding organizations now recommend avoiding them entirely. The feeder handles the color. The nectar handles the fuel. These are separate jobs.
Migration Windows and What They Mean for Your Setup
About 15 hummingbird species regularly visit feeders in the United States, but which species you'll see depends almost entirely on geography. East of the Mississippi, the Ruby-throated Hummingbird dominates — it's the only species most eastern birders will ever encounter. Western states enjoy dramatically more diversity, with Anna's, Costa's, Rufous, Black-chinned, and Broad-tailed hummingbirds among the regular visitors depending on region.
For most of the country, the active hummingbird season runs May through September. The practical implications: put feeders out one to two weeks before hummingbirds are expected in your region — late March or early April for southern states, mid-April for the mid-Atlantic and Midwest, late April to early May for New England and the northern tier. Keep feeders up for two weeks after you see your last hummingbird in fall, typically mid-September through early October. Migrating birds depend on reliable fuel sources, and an early takedown can leave a late migrant without options at a critical moment.
One important note: in parts of California, Arizona, and the Gulf Coast, Anna's Hummingbirds are year-round residents. If you're in those regions, your feeder maintenance calendar looks different — there's no off-season. You'll also want to consider heated hummingbird feeders to prevent nectar from freezing during cold snaps. For help telling species apart, our green hummingbird identification guide covers the five most common North American species.
Choosing a Hummingbird Feeder: What Actually Matters
Walk into any garden center and you'll find an overwhelming wall of hummingbird feeders ranging from $8 to $80. Most of them will work adequately. A handful will work exceptionally. A few will create more problems than they solve. Here's how to tell the difference.
The Two Fundamental Feeder Designs
Bottle-style feeders are the classic inverted-bottle design most people picture when they think of hummingbird feeders. Nectar fills an inverted reservoir and feeds down to ports at the bottom. They hold more nectar — typically 16 to 32 ounces — which means less frequent refilling. The downside is cleaning: the narrow bottle neck makes thorough scrubbing difficult, and hummingbird feeders need to be genuinely clean, not just rinsed.
Saucer-style feeders are shallow dish designs with ports in a flat lid. They hold less nectar — usually 8 to 16 ounces — but they're dramatically easier to clean. If bees are a persistent issue, bee-proof feeder designs can help. The entire feeding surface is accessible. No corners where mold hides. No bottle necks that require specialized brushes. For anyone who takes maintenance seriously (and you should, for reasons covered below), saucer designs have a meaningful practical advantage.
After testing both designs extensively, saucer feeders earn the primary position in most serious setups. The $16 red plastic saucer design that many experienced feeders rely on as their workhorse isn't glamorous, but it works. Three years of daily use, twice-daily refills during peak season, and it still functions perfectly. The ease of cleaning translates directly into healthier nectar and more consistent hummingbird traffic.
Glass vs. Plastic: The Longevity Calculation
Glass feeders last 10 or more years under normal conditions — we review the best glass hummingbird feeders separately. Plastic feeders typically last two to three years before UV degradation causes cracking and discoloration. Over a decade, a $35 glass feeder costs less than the succession of $15 plastic feeders that replace each other every few years.
That said, plastic feeders have legitimate advantages: they're lighter, they don't shatter when dropped during cleaning, and the lower upfront cost makes them sensible for first-time buyers who aren't yet sure they'll maintain the hobby. The quality plastic saucer feeders — not the cheap decorative ones — represent genuinely good value for most backyard birders.
Glass feeders in the $35 to $45 range, such as the More Birds Vintage collection or similar quality options, make sense for committed birders who want to invest once rather than repeatedly. The Grateful Gnome glass feeders at around $35 and the Perky-Pet Antique Copper options around $29 represent the lower end of glass pricing where longevity benefits start making financial sense. For a candid look at Perky-Pet's full hummingbird feeder lineup, including durability concerns with some models, see our Perky-Pet hummingbird feeder review.
What to Look For (and What to Avoid)
Look for:
- Red coloring on the feeder body or ports (not in the nectar)
- Wide port openings that allow thorough cleaning
- Dishwasher-safe components where possible
- Simple construction with minimal crevices where mold can establish
- Adequate capacity for your expected traffic — 16 ounces handles light to moderate traffic; busy feeders may need 32-ounce capacity by midsummer
Avoid:
- Decorative feeders with elaborate designs that make cleaning difficult or impossible
- Feeders with yellow flowers or accents on the ports (yellow attracts bees and wasps more than hummingbirds)
- Extremely cheap feeders with thin plastic that warps in sunlight
- Feeders with narrow necks that require specialized brushes you'll inevitably lose
Window Feeders: The Special Case
Window-mounted feeders deserve separate consideration because they serve a different purpose than standard feeders. We cover product picks and suction cup quality in our best window hummingbird feeders guide. A window feeder positioned with suction cups directly on the glass typically gets a fraction of the traffic of a primary yard feeder — roughly 10% of visits in a multi-feeder setup. But it provides something standard feeders can't: close observation at essentially arm's length.
The physics of window strikes actually works in your favor here. The danger zone for fatal window collisions is three to ten feet from the glass. Feeders within three feet of the window actually reduce strike risk rather than increasing it, because birds approaching that close recognize the glass as a solid surface rather than a passage. Position a window feeder within three feet of the glass and you get exceptional viewing with reduced collision risk. Position a standard feeder in the four-to-nine-foot range and you've created a genuine hazard.
The Nectar Question: Why Homemade Wins Every Time
This section matters more than any feeder recommendation. The nectar you use determines whether hummingbirds treat your yard as a reliable resource or an occasional stop. Get this right and feeder choice becomes almost secondary.
The Recipe
One part white granulated sugar to four parts water. That's it. That's the entire recipe. We go deeper on ratios, storage, and common mistakes in our dedicated hummingbird nectar recipe and sugar-to-water ratio guides.
Boil the water, dissolve the sugar completely, let it cool to room temperature before filling feeders. A double batch — half a cup of sugar to two cups of water — fills multiple feeders and takes exactly four minutes from kettle to refrigerator. Stored in a glass jar, it stays fresh for up to two weeks refrigerated, which means you can make a week's worth at once and refill from the jar rather than cooking every other day.
The 1:4 ratio matters. It closely approximates the sugar concentration of the flower nectars hummingbirds evolved to consume. Stronger solutions — 1:3 ratios that some sources recommend — are harder for hummingbirds to process and may contribute to liver problems with long-term use. Weaker solutions — 1:5 or more dilute — provide insufficient caloric density for birds running on the metabolic edge. The 1:4 ratio is the standard recommended by ornithologists and wildlife rehabilitators for good reason.
Why Commercial Nectar Fails
Commercial hummingbird nectars — the red liquid concentrates and the powder mixes — have three problems.
First, cost. Commercial nectar runs approximately $47 per month during peak feeding season when you're maintaining multiple feeders with twice-daily refills. Homemade nectar costs about $4 per month for sugar. The $43 monthly difference adds up to $516 over a single feeding season. Over three years, that's over $1,500 in unnecessary spending.
Second, additives. Most commercial nectars contain red dye, preservatives, and flavor additives that hummingbirds don't need and may be harmed by. The red dye concern is significant enough that the American Bird Conservancy and most serious birding organizations recommend clear nectar exclusively.
Third, performance. Blind testing — offering homemade and commercial nectar simultaneously to established hummingbird populations — consistently shows preference for the simple 1:4 sugar-water solution. Hummingbirds evolved to consume flower nectar: sugar and water. The additives in commercial products don't improve palatability. They exist for marketing purposes.
The $12 bottle of red nectar concentrate that many beginners purchase sits mostly unused in pantries for years after the switch to homemade. It's not a failure of commitment — it's a rational response to discovering that the simple solution works better.
Nectar Freshness: The Non-Negotiable
Hummingbird nectar ferments and grows mold. This isn't a minor inconvenience — fermented nectar can cause fatal fungal infections in hummingbirds, and moldy feeders spread disease through an entire local population. Freshness maintenance is the highest-stakes aspect of hummingbird feeding.
Under normal conditions, change nectar every three to five days. When temperatures exceed 75 degrees Fahrenheit, change every two to three days. During heat waves above 90 degrees, daily changes may be necessary.
This sounds demanding until you establish the routine. Making double batches and storing extra in the refrigerator means refilling is a 90-second task rather than a cooking project. The batch schedule — large batches on Sunday, midweek refills from refrigerated stock — keeps fresh nectar available without constant effort.
Feeder Placement: The Variables That Double Your Visitation
The best feeder filled with perfect nectar will underperform if placed incorrectly. Hummingbird placement decisions involve four variables: height, sun exposure, proximity to cover, and distance from competing feeders.
Height
Hang feeders four to five feet above the ground. This approximates the height of many flowering plants hummingbirds naturally visit and puts the feeding ports at a comfortable angle for hovering birds. Higher placements aren't necessarily wrong, but they reduce the quality of observation and can make maintenance awkward.
Sun Exposure
Partial shade is ideal. Full sun accelerates nectar fermentation — a feeder in direct afternoon sun may need daily changes during summer even in moderate temperatures. Full shade is better than full sun, but the ideal placement catches morning light and afternoon shade, which keeps nectar cooler and extends freshness while still making the feeder visually prominent.
Proximity to Cover
Hummingbirds, like most birds, feel safest with escape routes nearby. Position feeders within 10 to 15 feet of trees, shrubs, or other vegetation that provides perching and cover. This isn't just about safety — male hummingbirds establish territorial perches from which they monitor their feeding area, and a feeder without suitable nearby perches may attract fewer territorial males, which in turn attracts fewer birds overall.
The perching requirement is worth taking seriously. A territorial male who claims your primary feeder as his resource will defend it aggressively — which sounds counterproductive but actually increases overall traffic, because subordinate birds will make feeding attempts throughout the day, and the territorial male's presence signals to passing migrants that this is a reliable, established resource.
Window Distance
The danger zone for window strikes is four to nine feet from glass. Position feeders either within three feet of windows (where birds recognize the glass as a solid surface) or more than ten feet away (where they have adequate time to course-correct). The three-feet-or-closer rule is counterintuitive but well-supported by collision research — it's the intermediate distances that kill birds.
Managing Multiple Feeders
Hummingbird territoriality creates a specific challenge: a dominant male will attempt to monopolize a single feeder, spending more energy defending it than feeding from it and actively excluding subordinate birds. Multiple feeders spaced so they can't be simultaneously monitored from a single perch solve this problem elegantly.
The current recommendation for a three-feeder setup: space feeders at least 20 feet apart, ideally with visual barriers (trees, shrubs, corners of the house) between them so no single bird can watch all three simultaneously. This forces territorial birds to choose one feeder to defend, leaving others open for subordinate birds and migrants. Traffic across all feeders increases substantially compared to a single-feeder setup.
The primary feeder in a well-established multi-feeder yard will typically handle 80% of traffic. A secondary feeder positioned out of the primary's sight line serves subordinate birds. A window feeder provides close observation opportunities regardless of its lower traffic share.
Feeder Maintenance: The Schedule That Keeps Hummingbirds Healthy
Maintenance is where most hummingbird feeding setups fail. The commitment required is modest but non-negotiable.
The Regular Cleaning Schedule
Rinse and refill feeders on the nectar change schedule described above — every three to five days under normal conditions, more frequently in heat. This isn't optional. Fermented nectar and mold are genuine health risks to hummingbirds, not just aesthetic problems.
Every two weeks, perform a thorough cleaning with a dilute bleach solution: one part bleach to nine parts water. For the complete step-by-step process, see our guide on how to clean hummingbird feeders. Disassemble the feeder completely, soak all components for several minutes, scrub with a brush (bottle brushes and small detail brushes for ports), rinse thoroughly — and this step matters — dry completely before refilling. Residual bleach in a feeder is harmful; thorough rinsing eliminates the risk.
Saucer-style feeders are faster to clean thoroughly because all surfaces are accessible. Bottle-style feeders require more attention to ensure the interior is genuinely clean rather than just rinsed.
Seasonal Maintenance Considerations
Spring startup: Clean feeders thoroughly before the season's first use even if they were cleaned before storage. Rinse with the bleach solution, rinse again with clean water, dry completely.
Peak summer: Check feeders daily during heat waves. Nectar that looks cloudy or has visible particles has spoiled and needs immediate replacement along with a cleaning cycle.
Fall takedown: Keep feeders up for two weeks after your last hummingbird sighting. When you're certain the season is over, perform a final thorough cleaning before storage. Storing a feeder with dried sugar residue creates a cleaning challenge in spring and may harbor mold through the winter.
Ant and Bee Management
Two common feeder pests require specific solutions.
Ants reach feeders by walking down the hanging wire or chain. The solution is an ant moat — a small water-filled cup that interrupts the ant's path. Ant moats cost five to ten dollars and work reliably. They need periodic refilling, particularly during dry weather. This is the only effective long-term ant solution; greasy or sticky barriers on hanging wires work briefly and then fail.
Bees and wasps are attracted to nectar, particularly through yellow feeder components. The first line of defense is choosing feeders without yellow accents on the ports. If bees establish a presence, moving the feeder a few feet often breaks the established foraging pattern — bees return to the location they memorized rather than searching for the moved feeder. Hummingbirds, with better spatial memory and visual acuity, find the relocated feeder quickly.

Feeder Selection by Situation: Matching the Feeder to Your Setup
General principles are useful, but specific situations call for specific recommendations. Here's how to match feeder choice to your actual circumstances.
For First-Time Buyers
Start with a single quality saucer feeder in the $15 to $25 range — or build your own from a mason jar if you prefer a hands-on approach. The red plastic saucer designs that have been on the market for decades are inexpensive, easy to clean, easy to fill, and genuinely effective. Resist the urge to buy multiple feeders before you've established that hummingbirds are visiting your yard — a single well-placed feeder is more effective than three poorly placed ones, and it's easier to maintain while you're learning the routine.
Budget $50 total for your first season: one feeder, an ant moat, and enough sugar for the season. That's the complete starting investment for a setup that actually works. Want to spend even less? Our 5 DIY hummingbird feeder designs can get you started for under $10 in materials.
For Established Feeders Scaling Up
Once hummingbirds are reliably visiting and you're refilling regularly, the case for a multi-feeder setup becomes clear. Add a second feeder positioned out of sight of the first, and a window feeder if close observation appeals to you. The $16 plastic saucer as primary feeder, a second identical saucer as the territorial backup, and a small window-mounted feeder represents a setup that costs under $60 total and handles substantial hummingbird traffic.
For Committed Birders Investing Long-Term
Glass feeders in the $35 to $45 range make sense once you know you're committed to the hobby long-term. The More Birds Vintage glass feeders (16 to 32 ounce capacity, $35 to $45) and similar quality glass options will outlast multiple generations of plastic feeders. Pair a quality glass primary feeder with the plastic saucer backup and window feeder — there's no rule requiring all feeders to match, and the plastic saucer's cleaning advantages make it worth keeping even if you upgrade the primary.
For Balcony and Small-Space Feeders
Window-mounted feeders and small saucer designs work well in limited spaces. The key limitation is traffic management — a single small feeder on a balcony will attract territorial behavior from a dominant male, which can mean other birds are excluded. If space allows only one feeder, accept that you'll have one or two regular visitors rather than the variety a multi-feeder yard produces.
Attracting More Hummingbirds: Beyond the Feeder
The feeder is the foundation, but the surrounding environment determines whether your yard becomes a destination or a waypoint.
Native Plants as Feeder Supplements
Hummingbirds evolved with flowers, not feeders. Native plantings that provide natural nectar sources extend feeding opportunities, create the cover and perching structure hummingbirds prefer, and make your yard more attractive to migrating birds who may not yet know your feeders exist.
The most effective native plants for hummingbird attraction vary by region, but some reliable performers across most of the country include trumpet vine (Campsis radicans), native honeysuckle (Lonicera sempervirens rather than the invasive Japanese species), bee balm (Monarda), cardinal flower (Lobelia cardinalis), and salvia species. These plants provide nectar when feeders are temporarily unavailable, serve as natural territorial markers, and attract the insects that hummingbirds also consume for protein.
The relationship between native plantings and feeder traffic is synergistic rather than competitive. Yards with both feeders and native plantings consistently attract more hummingbirds than yards with either alone.
Water Features
Hummingbirds bathe and drink, and moving water is particularly attractive. A simple mister or dripper positioned near your primary feeder adds significant appeal. Hummingbirds prefer to fly through fine mist rather than dip into standing water — a misting attachment on a standard garden hose, or a dedicated solar-powered fountain with a mist setting, provides what they're looking for.
A solar-powered fountain with mist setting positioned six feet from the primary feeder and within ten feet of perching branches creates an ideal combination. The sound of moving water also serves as an attractant, drawing hummingbirds that might otherwise pass through without investigating.
Perching Opportunities
Territorial males spend significant time perching and monitoring their territory between feeding bouts. A bare branch, a thin wire, or a dedicated perching stake within sight of the primary feeder serves this need. The male's visibility from his perch is actually beneficial — his presence signals territory quality to passing migrants, and his feeding activity demonstrates that the feeder is a reliable resource.
Troubleshooting Common Hummingbird Feeder Problems
Even well-designed setups encounter problems. Here are the most common issues and their solutions.
Hummingbirds Aren't Coming
The most common cause of empty feeders in appropriate habitat is patience, not failure. New feeders often sit empty for days or weeks before hummingbirds discover them. Seventeen days of an empty feeder before the first visit is not unusual — it's the normal discovery timeline. Hummingbirds are cautious about new food sources and tend to investigate incrementally before committing.
If feeders remain empty beyond three weeks during the active migration window, evaluate placement. Is the feeder visible from above? Is it within reasonable distance of cover? Is it in the appropriate height range? Moving a feeder a few feet can make a significant difference in discovery rate.
Nectar Disappearing Without Hummingbird Sightings
Overnight nectar disappearance typically indicates bats in regions where nectar-feeding bats are present. Daytime disappearance without visible hummingbirds usually means ants (check for ant trails) or, in some regions, orioles, which are attracted to hummingbird feeders and can drain them quickly.
Cloudy Nectar Within a Day or Two
Nectar that clouds within 24 to 48 hours of a fresh fill indicates either contaminated water, residual soap in the feeder (always rinse thoroughly after cleaning), or ambient temperatures high enough to accelerate fermentation. During heat waves above 90 degrees, daily changes may be necessary regardless of other factors. If cloudiness persists despite daily changes, perform a thorough bleach cleaning of the feeder and check that all components are rinsing completely clean.
Aggressive Territorial Behavior Excluding Most Birds
A single dominant male controlling a single feeder will exclude most other hummingbirds. The solution is the multi-feeder approach described above: add a second feeder positioned out of sight of the first. The dominant male cannot defend both simultaneously, and subordinate birds gain access to at least one feeder. This typically increases total hummingbird traffic rather than just redistributing it — more birds visit a yard that offers reliable access than one where access is uncertain.
The Economics of Hummingbird Feeding
Hummingbird feeding is one of the more cost-effective wildlife hobbies available. The startup investment is modest, the ongoing costs are minimal with homemade nectar, and the equipment lasts for years with proper maintenance.
Startup Costs
A functional single-feeder setup: one quality saucer feeder ($16 to $25), an ant moat ($5 to $10), and sugar for the season ($8 to $12 for a five-pound bag that lasts most of the season). Total: approximately $30 to $47.
A three-feeder setup with window feeder: primary saucer ($16), secondary saucer ($16), window feeder ($15 to $25), ant moats for each ($15 to $20 total), solar fountain optional ($34). Total without fountain: approximately $62 to $77. With fountain: approximately $96 to $111.
Ongoing Costs
With homemade nectar at the 1:4 ratio, peak-season costs run approximately $4 per month for sugar even when maintaining three feeders with twice-daily refills. That's the complete ongoing cost — there's nothing else to buy regularly.
Compare this to cardinal feeding, which runs approximately $47 per month for black oil sunflower seeds, and hummingbird feeding looks remarkably economical. If you want to document your visitors with a camera, the Bird Buddy hummingbird feeder is a popular option — though the ongoing cost is the hardware, not the nectar. The $43 monthly difference between commercial nectar and homemade represents real money over a feeding season.
Long-Term Value
Quality feeders maintained properly last years. The $16 plastic saucer that serves as a reliable primary feeder for three or more years costs less than $6 per year. A $35 glass feeder amortized over ten years costs $3.50 per year. The economics strongly favor quality over the long term, and the maintenance investment — primarily time rather than money — determines longevity more than initial price.
Building a Hummingbird-Friendly Yard: The Long View
Hummingbirds have remarkable memory. They remember human faces, specific feeder locations, and productive yards year after year. A yard that proves reliable over multiple seasons becomes a destination on established migration routes — birds return not just because feeders are present, but because this specific location has a track record of reliability.
This long-view perspective changes how you think about the occasional frustrations of hummingbird feeding. The seventeen empty days before the first visit aren't failure — they're the investment period before a relationship is established. The territorial male who returns for a third consecutive season isn't just a bird using a feeder — he's evidence that your yard has earned a place in an individual animal's mental map of reliable resources.
The nectar corridor concept — creating a connected series of native plantings and feeders that supports hummingbirds through an entire migration route — represents the most ambitious version of this long-view approach. Even at the backyard scale, the principle applies: consistency, quality, and reliability over time build the kind of hummingbird traffic that makes the whole enterprise rewarding.
What to Expect in Year One vs. Year Three
Year one is the discovery year. Traffic will be lighter than it will become. You'll make mistakes — most people do, and most mistakes are correctable. The important things to get right in year one are nectar quality, freshness maintenance, and basic placement. Everything else can be refined.
By year three, patterns emerge that year one couldn't predict. Individual birds become recognizable by behavior. The territorial male's arrival time becomes predictable enough to watch for. The female who nests in the maple tree becomes a known quantity. The juveniles from last season return as adults and establish their own positions in the yard's hierarchy.
The progression from novice to experienced hummingbird feeder isn't dramatic. It's incremental knowledge built through observation — which is, ultimately, what makes the whole enterprise worth doing.
Hummingbird feeding rewards attention and punishes neglect, which makes it a better hobby than most people expect when they hang that first feeder. The requirements are clear, the costs are modest, and the returns — in terms of what you actually get to observe from your kitchen window — are disproportionate to the investment.
Start with one good feeder, the right nectar recipe, and a sensible placement. Maintain it consistently. Give it time. The rest follows naturally from there.