Mason Jar Hummingbird Feeder DIY Guide That Works
The Mason Jar Hummingbird Feeder DIY Guide That Actually Works
There are approximately 47 ways to make a mason jar hummingbird feeder wrong. I know this because the internet contains approximately 47 different tutorials, and most of them skip the details that actually matter.
Before you dismiss this as another craft-blog project dressed up as bird care advice, hear me out. A properly built mason jar feeder can last years, attract consistent hummingbird traffic, and cost you less than $15 to assemble. A poorly built one will leak nectar down your window, ferment in the summer heat before hummingbirds can reach it, and send you back to the big-box store within a week. The difference between those two outcomes comes down to a handful of specific choices that most tutorials gloss over entirely.
This is the mason jar hummingbird feeder DIY guide I wish had existed when I started. It covers materials, construction, nectar, placement, and maintenance — because building the feeder is only the beginning. If you're exploring other options, we also have 5 additional DIY hummingbird feeder designs ranging from simple bottle feeders to decorative macramé builds.
Key Takeaways
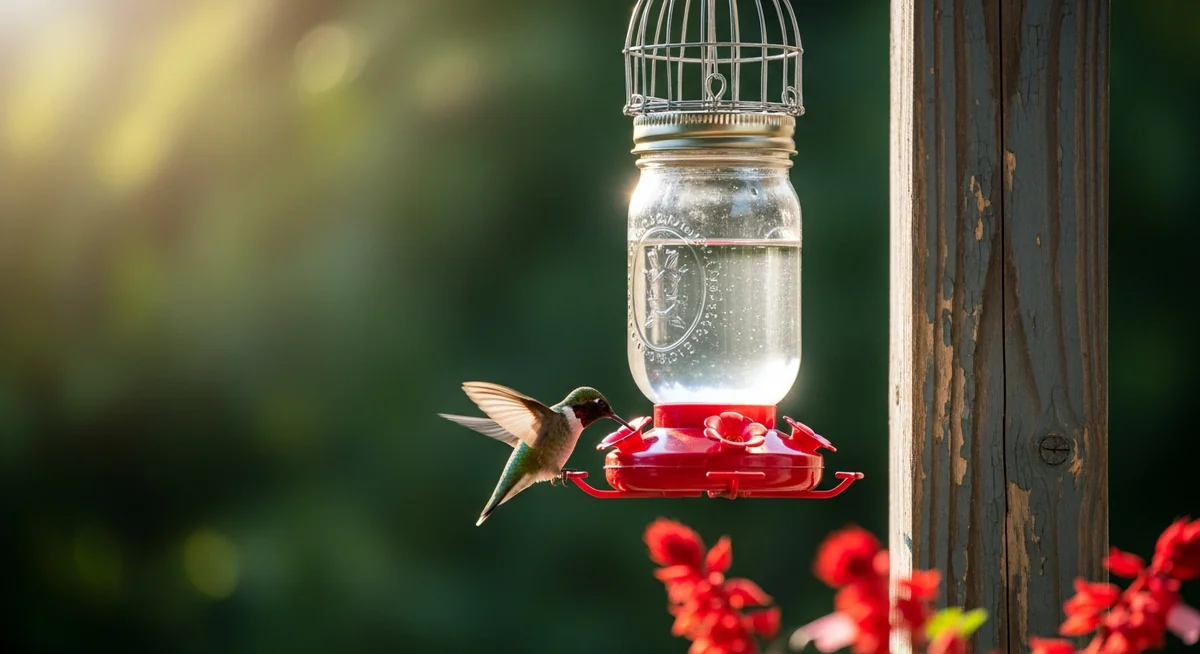
- Use a 16-oz wide-mouth mason jar with a dedicated feeder port lid kit ($4–$8) and an ant moat to build a feeder that lasts 10+ years for under $15.
- Make nectar with 1 part white granulated sugar to 4 parts water — no red dye, no honey, no commercial concentrate.
- Change nectar every 3–5 days (every 2–3 days above 75°F) and clean thoroughly with dilute bleach solution every two weeks.
- Hang feeders 4–5 feet high, either within 3 feet or beyond 10 feet of windows to prevent fatal bird strikes.
- Use multiple feeders spaced 20+ feet apart to prevent territorial males from monopolizing the food source.
What You Need Before You Start
The Jar Itself
Not all mason jars are created equal for this purpose, and the distinction matters more than you'd think.
Wide-mouth mason jars are significantly easier to work with than regular-mouth jars. You'll be cleaning this container every few days throughout hummingbird season — May through September in most regions — and a wide-mouth jar allows you to reach every interior surface without specialized brushes. A standard 16-ounce wide-mouth jar is the ideal starting size. Large enough to hold meaningful nectar volume, small enough that you'll cycle through the contents before they spoil.
Avoid decorative mason jars with embossed patterns on the glass. They look charming on a shelf. They're impossible to clean thoroughly, and nectar residue in those grooves becomes a bacterial and mold problem within days during hot weather.
Ball and Kerr wide-mouth jars are both excellent choices and available at virtually every hardware store and grocery store for $1 to $2 per jar. The lids that come with them are irrelevant for this project — you'll be replacing the lid assembly with a feeder port.
The Feeder Port Assembly
This is where most DIY tutorials either overcomplicate things or skip critical information entirely.
You have two options:
Option 1: Purchase a dedicated mason jar hummingbird feeder lid kit. These are available on Amazon and at many wild bird specialty stores for $4 to $8. They consist of a red plastic lid that replaces the standard mason jar lid, with one or more feeding ports built in. The red color matters — hummingbirds have exceptional color vision and are strongly attracted to red, which signals nectar sources. Look for kits with at least two feeding ports to reduce territorial conflict between birds.
Option 2: Repurpose a commercial feeder's port assembly. If you have an old plastic feeder that's cracked or damaged beyond use but still has functional ports, these can sometimes be adapted. This approach requires more improvisation and isn't recommended for beginners.
The dedicated lid kit is the right choice for most people. Spend the $6.
Additional Materials
- Wire or chain for hanging: 18-gauge galvanized wire works well. You need enough to create a secure cage around the jar and a hanging loop at the top. Approximately 3 to 4 feet total.
- Wire cutters and needle-nose pliers
- Ant moat: A simple ant moat that hangs above the feeder costs $5 to $10 and is not optional if you want functional hummingbird feeding. More on this shortly.
- White granulated sugar and water: The only ingredients you need for nectar.
Total material cost for a single feeder: $10 to $15.
Building the Feeder
Step 1: Prepare the Jar
Wash the jar thoroughly with hot soapy water and rinse completely. Even new jars benefit from this step. Allow it to dry fully before assembly — residual water dilutes your nectar ratio and can introduce contamination.
Step 2: Install the Feeder Port Lid
If you're using a purchased lid kit, follow the manufacturer's instructions for your specific product. Most simply screw onto the jar in place of the standard lid. Ensure the seal is tight — a loose port assembly is the primary cause of nectar leaks.
Test the seal before hanging. Fill the jar halfway with plain water, invert it, and hold it upside down over a sink for 30 seconds. If water drips from anywhere other than the feeding ports themselves (where a small amount of seepage is normal due to the vacuum system), tighten the assembly or check for cracks.
Step 3: Create the Wire Hanger
This step separates a feeder that lasts from one that falls and shatters on your patio.
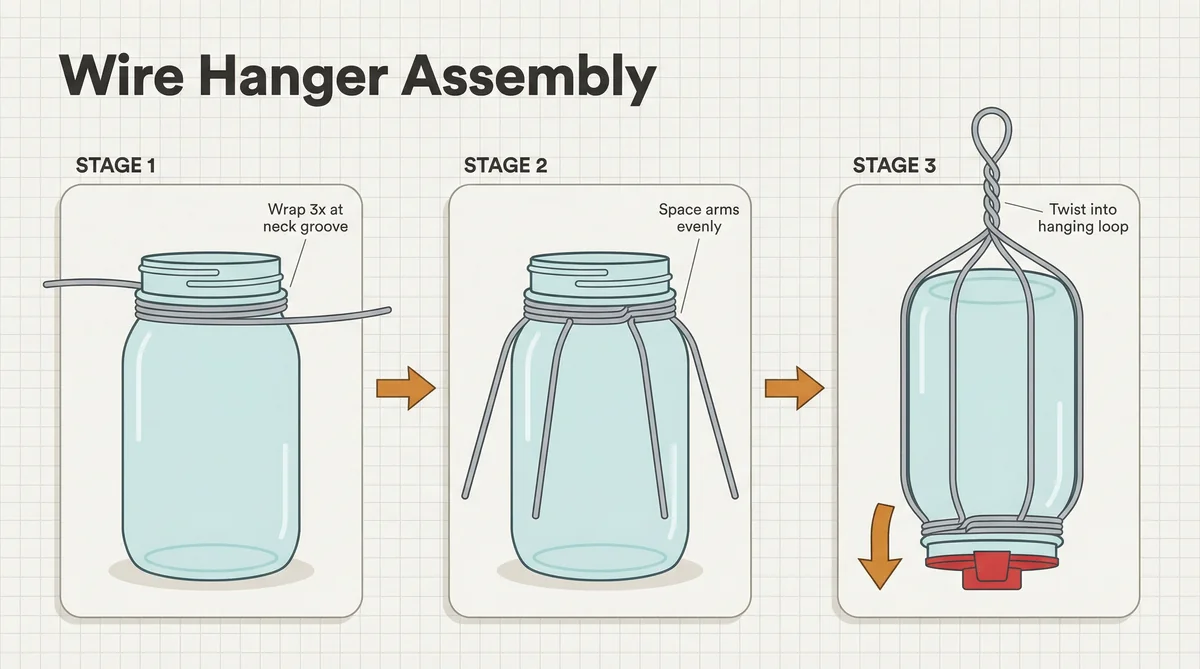
Cut a length of 18-gauge wire approximately 36 inches long. Starting near the base of the jar (which will become the top when the feeder is inverted), wrap the wire around the jar's neck groove — the indentation just below the threading. Make three complete wraps and twist the ends together securely with pliers.
From this wrapped base, create three or four evenly spaced wire arms that extend upward along the sides of the jar. These arms should meet approximately 4 to 6 inches above the jar's base (again, this will be the top when inverted) and twist together to form a central hanging loop.
The goal is a wire cage that holds the jar securely even if the lid assembly loosens slightly. A jar of nectar weighs roughly a pound when full. The wire hanger needs to support that weight reliably through wind, rain, and the occasional hummingbird landing.
Step 4: Hang the Ant Moat Above the Feeder
An ant moat is a small cup-shaped device filled with water that hangs between your hook and your feeder. Ants cannot cross standing water, so the moat creates a barrier that keeps them out of the nectar. Without an ant moat, ants will find your feeder within days, contaminate the nectar, and deter hummingbirds from using it.
This is the step most DIY tutorials omit. Don't skip it.
The Nectar: The Part That Matters Most
The feeder is a vessel. The nectar is the reason hummingbirds come.
Hummingbirds must feed every 10 to 15 minutes throughout the day and consume approximately half their body weight in sugar daily. Their hearts beat up to 1,260 times per minute and their wings beat 50 to 80 times per second. The metabolic demands are extraordinary, which means the nectar quality you provide directly affects their survival.
The Only Nectar Recipe You Need
1 part white granulated sugar to 4 parts water.
That's it. Boil the water, dissolve the sugar completely, allow the mixture to cool to room temperature before filling the feeder. Store any excess in the refrigerator, where it stays fresh for up to two weeks.
A practical batch for a 16-ounce mason jar: 1/2 cup sugar dissolved in 2 cups water. This fills the jar completely and takes approximately four minutes from kettle to refrigerator.
What Not to Use
Do not use red food coloring. The red dye in commercial nectar products can be harmful to hummingbird kidneys. Your feeder's red port assembly provides all the visual attraction hummingbirds need. The nectar itself should be clear.
Do not use honey. Honey ferments rapidly and promotes dangerous bacterial growth in feeders.
Do not use brown sugar, raw sugar, or artificial sweeteners. White granulated sugar most closely mimics the sucrose composition of natural flower nectar. Other sweeteners introduce compounds hummingbirds cannot properly metabolize.
Do not purchase commercial nectar concentrate. Beyond the red dye concern, commercial nectar products cost dramatically more than homemade nectar with no benefit to the birds. The math is stark: homemade nectar costs roughly $4 per month during peak season. Commercial products cost significantly more for an inferior result.
Nectar Change Frequency
This is non-negotiable: change the nectar every 3 to 5 days under normal conditions, and every 2 to 3 days when temperatures exceed 75 degrees Fahrenheit.
Nectar ferments. Fermented nectar makes hummingbirds sick. In the heat of July and August, nectar in a hanging feeder can begin fermenting within 48 hours. If the nectar looks cloudy, smells sour, or shows any visible mold, empty the feeder immediately, clean it thoroughly, and refill with fresh nectar.
Placement: Where You Hang It Changes Everything
Height and Position
Hang your mason jar feeder 4 to 5 feet above the ground. This height places it within comfortable feeding range while keeping it accessible for your maintenance routine. Feeders hung too high are difficult to monitor for nectar levels and spoilage.
Distance from Windows
Position feeders either within 3 feet of your windows or more than 10 feet away. The danger zone for fatal window strikes is 3 to 10 feet from glass. Hummingbirds flying at speed cannot course-correct in time when a window reflection fools them into thinking they're flying toward open space. A feeder placed close to a window — counterintuitively — is actually safer because birds approaching from close range don't build dangerous momentum.
Shade and Sun
Partial shade extends nectar freshness meaningfully. A feeder in direct afternoon sun will reach nectar-spoiling temperatures faster than one positioned under a tree or overhang. Morning sun is less problematic than afternoon exposure.
Multiple Feeders and Territorial Behavior
Hummingbirds, particularly male Ruby-throated Hummingbirds in eastern states, are intensely territorial. A dominant male will actively guard a single feeder and chase away competing birds, including females and juveniles. If you want to attract multiple hummingbirds, hang multiple feeders positioned so they're not simultaneously visible from a single perching point.
Space additional feeders at least 20 feet apart, ideally around a corner of the house or on opposite sides of a yard. This prevents one bird from monopolizing all feeding resources.
Cleaning and Maintenance
The Cleaning Schedule
Every time you change the nectar — which is every 3 to 5 days at minimum — clean the feeder. For routine cleaning, hot water and a bottle brush are sufficient. Pay particular attention to the feeding ports, where mold develops first.
Every two weeks, perform a thorough cleaning with a dilute bleach solution: 1 part bleach to 9 parts water. Disassemble the port assembly completely, soak all components for 10 minutes, scrub with a brush, rinse thoroughly multiple times, and allow everything to dry completely before reassembling and refilling. Any bleach residue left in a feeder is harmful to hummingbirds, so the rinse step is critical.
Seasonal Timing
Put feeders out 1 to 2 weeks before hummingbirds are expected to arrive in your region — late March or early April for most of the continental United States. Keep feeders up for 2 weeks after you see the last hummingbird in fall, typically mid-September to early October. Leaving feeders up does not prevent hummingbirds from migrating; it supports late-season migrants passing through who need fuel for the journey.
Common Problems and What They Mean
Feeder empties within hours: You have established hummingbird traffic. Add a second feeder.
Feeder never empties: Either hummingbirds haven't found it yet (new feeders often sit empty for days or even weeks as birds are cautious about new food sources — this is completely normal), the nectar has spoiled and birds are avoiding it, or placement is problematic. Try moving the feeder closer to flowering plants or in a more sheltered location.
Nectar leaks constantly: The port assembly seal is compromised. Check that the lid is fully tightened. If leaking continues, the port assembly itself may be cracked and needs replacement.
Ants in the feeder: Install or refill the ant moat. Check that the moat water hasn't evaporated — this requires regular attention during hot weather.
Cloudy or stringy nectar: This is mold or fermentation. Empty immediately, perform a thorough bleach cleaning, and refill with fresh nectar. Consider increasing change frequency.
A mason jar hummingbird feeder built correctly — with a proper port assembly, a secure wire hanger, an ant moat, and a consistent nectar and cleaning schedule — will outlast most commercial feeders and cost a fraction of the price. The glass construction alone gives it a 10-plus year lifespan compared to the 2 to 3 years typical of plastic feeders. More importantly, it works. Hummingbirds are creatures of memory and habit; they return to reliable nectar sources year after year, season after season. Build this feeder right, maintain it consistently, and you're not just setting up a craft project. You're establishing a waystation that real birds will depend on.
That's worth doing properly.