DIY Hummingbird Feeder: 5 Easy Homemade Designs
DIY Hummingbird Feeder: 5 Easy Homemade Designs That Actually Work
There's a statistic that stops people cold when they first hear it: hummingbirds must feed every 10 to 15 minutes throughout the day, consuming roughly half their body weight in sugar just to survive. Their hearts beat up to 1,260 times per minute. Their wings move 50 to 80 times per second. These are not casual visitors to your yard. They are metabolic marvels operating perpetually on the edge of empty, and they need reliable nectar sources more urgently than most people realize.
Which makes the $15 to $35 price tag on a commercial hummingbird feeder feel a little absurd when you consider what's actually required: a container that holds liquid, a port for a tiny beak, and something red to catch their attention. That's genuinely it. The engineering complexity of a commercial hummingbird feeder is approximately equal to a squeeze bottle with a flower-shaped cap. After three years of feeding hummingbirds and testing every feeder configuration imaginable, the conclusion is unavoidable — you can build something that works just as well from materials already sitting in your kitchen or recycling bin.
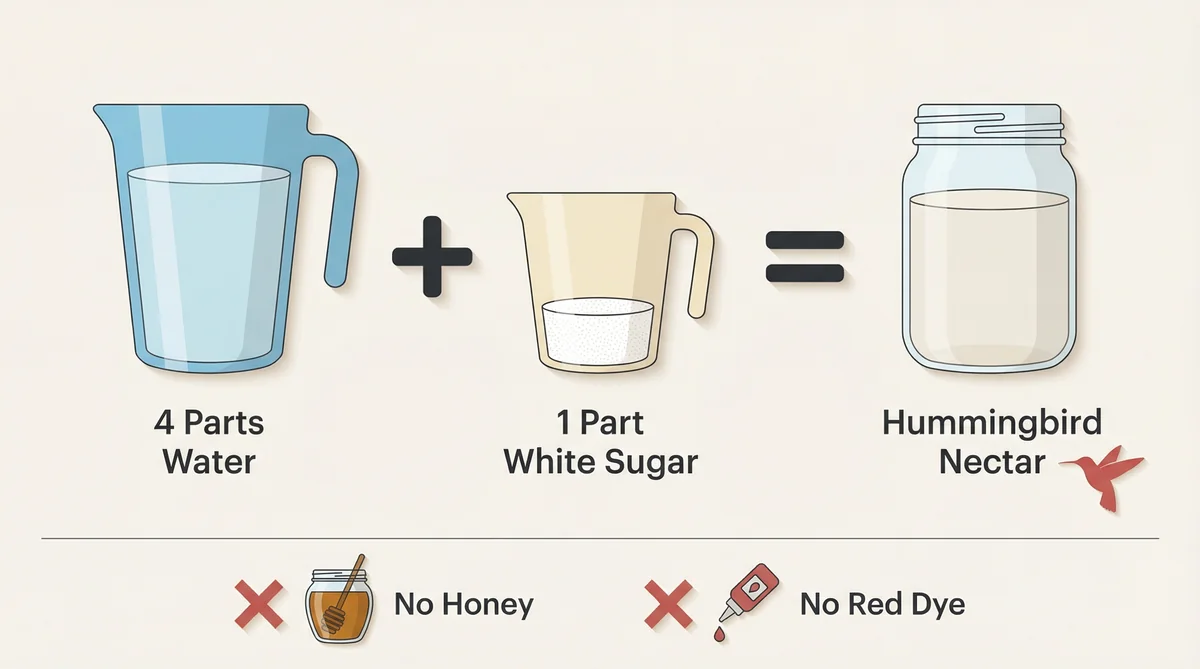
These five DIY hummingbird feeder designs range from a ten-minute project suitable for a rainy afternoon with kids to a decorative macramé creation that looks like it belongs in a garden boutique. All of them function on the same principle that makes commercial feeders work. And all of them can be filled with the same 1:4 ratio of white granulated sugar to water that hummingbirds have been visiting for three seasons running.
Key Takeaways
- Five DIY hummingbird feeder designs work as effectively as commercial feeders costing $15–$35, using materials already at home.
- The only nectar recipe hummingbirds need is 1 part white granulated sugar to 4 parts water — no red dye, honey, or sweeteners.
- Hang feeders at 4–5 feet high, within 3 feet or beyond 10 feet of windows to prevent fatal bird strikes.
- Change nectar every 3–5 days (every 2–3 days above 75°F) and clean feeders thoroughly with dilute bleach every two weeks.
- A DIY ant moat — a small water-filled cup on the hanging wire — costs almost nothing and prevents ants from contaminating nectar.
Why DIY Hummingbird Feeders Work as Well as Commercial Ones
Before getting into the designs, it's worth understanding what a hummingbird feeder actually needs to do — because once you understand the requirements, the DIY path makes obvious sense.
Hummingbirds have excellent color vision and are strongly attracted to red. This is the primary reason commercial feeders are almost universally red. But red is not magic — it's just a visual signal that says "nectar source here." A red bottle cap, a strip of red tape, or a red plastic piece purchased for pennies at a craft store accomplishes exactly the same thing.
The feeder needs to hold liquid without leaking, present a feeding port small enough to create light suction (which helps regulate flow), and hang securely. That's the complete functional specification. Everything else on a commercial feeder — the decorative flower motifs, the elaborate base designs, the branded packaging — is marketing.
There are a few practical considerations worth building into any homemade design. Hummingbird feeders should hang at 4 to 5 feet high, positioned within 3 feet or more than 10 feet from windows to prevent fatal strikes. Nectar needs changing every 3 to 5 days under normal conditions, and every 2 to 3 days when temperatures climb above 75 degrees — fermented nectar can harm the birds you're trying to help. And if ants are a problem in your area, a simple ant moat (the fifth design in this list) costs almost nothing to build and solves the problem completely.
With those fundamentals in place, here are five designs that genuinely work.
Design 1: The Classic Plastic Bottle Feeder
What you need: A clean plastic bottle (water bottle, juice bottle, or soda bottle), a rubber stopper with a hole drilled through it, a glass or metal tube (available at craft stores or online for under $2), red paint or red nail polish, twine or wire for hanging.
Time to build: 20 to 30 minutes, plus drying time if painting.
This is the foundational DIY hummingbird feeder design, and it works on a straightforward principle: an inverted bottle creates a partial vacuum that regulates nectar flow through the tube. The same physics that makes a commercial feeder work operates here without modification.
Start with a thoroughly cleaned bottle — any residual soap or food smell will deter birds. Drill or punch a hole through the rubber stopper sized to fit your tube snugly. The fit needs to be tight enough that nectar doesn't leak around the tube, but the tube itself should extend about an inch below the stopper into the nectar and about half an inch above it.
Paint the stopper red, or wrap red tape around it, or tie a small piece of red ribbon near the tube opening. Hummingbirds need that visual cue to identify the feeding port. Without it, they may investigate the feeder but struggle to locate exactly where to feed.
Fill the bottle with nectar — 1 part white granulated sugar dissolved in 4 parts water, cooled completely before use — insert the stopper firmly, invert the bottle, and hang it. The first few hours, you may see a small amount of nectar drip as the vacuum establishes itself. This is normal.
This design is excellent for families with children because the drilling can be done by an adult while kids handle painting and decorating. The bottle itself becomes a canvas — permanent markers, weather-resistant paint, decorative twine wrapping. Functionally, none of that matters. Aesthetically, it transforms a recycled bottle into something you're genuinely pleased to hang in your yard.
One important note: Plastic feeders typically last 2 to 3 years before UV degradation makes them brittle. Budget accordingly, or consider the glass version below.
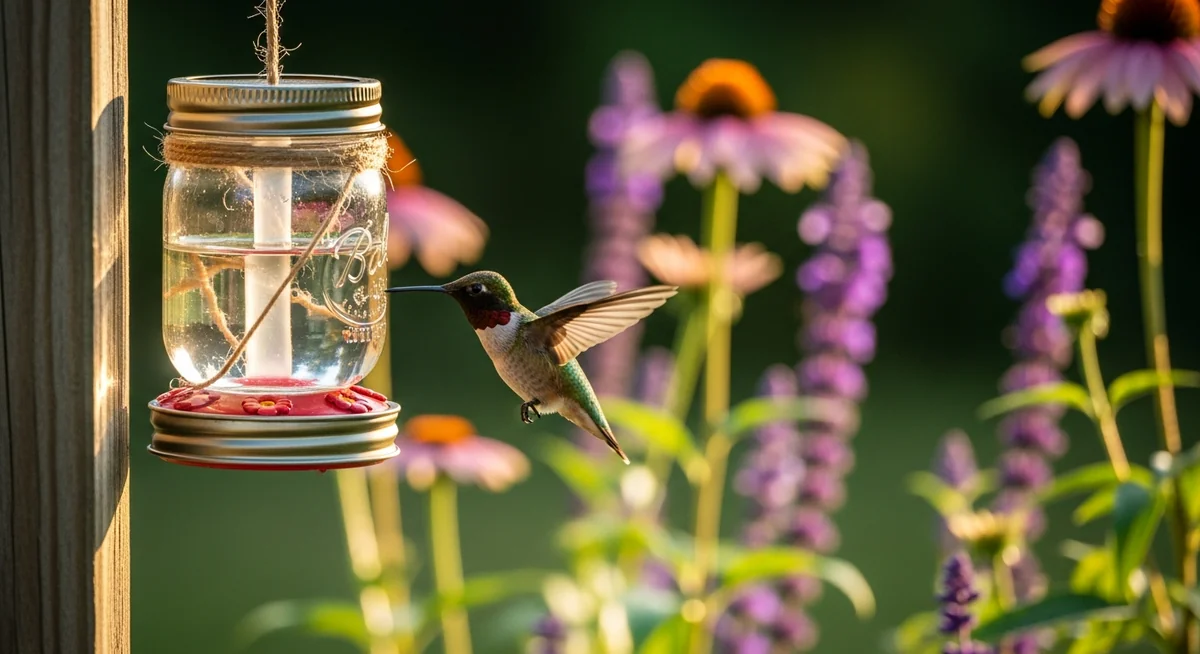
Design 2: The Mason Jar Feeder
For a more detailed version of this build, see our dedicated mason jar hummingbird feeder DIY guide.
What you need: A small mason jar (8-ounce works well), a commercial hummingbird feeder tube with stopper (available online for $3 to $5 for a pack of several), red paint or a red plastic piece, twine or wire for hanging.
Time to build: 10 to 15 minutes.
The mason jar feeder is the design that earns the description "so easy and yet, with beautiful results." Glass has a 10-plus year lifespan compared to 2 to 3 years for plastic, it doesn't leach chemicals into nectar, it's easier to clean thoroughly, and a small mason jar hanging from twine in a garden looks genuinely charming rather than improvised.
The construction couldn't be simpler. Purchase a pack of hummingbird feeder tubes — these are the small glass or plastic tubes with a rubber stopper on one end that slip through the lid of any container. Drill or punch a hole in the mason jar lid sized to accept the tube stopper. Paint the lid red, or hot-glue a small red plastic flower around the tube opening.
For hanging, there are two approaches. The twine method: wrap twine around the neck of the jar below the threading, knot it securely, and create a hanging loop. The wire method: wrap wire around the jar below its widest ridge, bend it back on itself for security, then extend the wire upward to form a hanger, with optional decorative spiral loops for visual interest. Both methods are secure for a small, filled mason jar.
Fill the jar with cooled nectar, screw on the modified lid, invert, and hang. The mason jar feeder is ideal for beginners, for children (with adult help for the lid modification), and for anyone who wants a feeder that looks intentional rather than improvised.
Design 3: The Macramé Bottle Feeder
What you need: A clear bottle (a clean wine bottle or large water bottle works beautifully), a commercial hummingbird feeder tube with stopper, macramé cord, scissors, optional beads or decorative elements.
Time to build: 45 to 90 minutes depending on macramé complexity.
This design separates the functional from the decorative in a genuinely elegant way. The bottle and tube handle the nectar delivery. The macramé handles everything else — creating a holder that allows the bottle to hang upside down while looking like a deliberate piece of garden art.
The basic macramé holder requires only square knots and half-hitch knots, both of which can be learned from a five-minute video tutorial. Cut eight lengths of macramé cord at roughly four times the desired finished length. Fold them in half and attach them to a small ring at the top. Work square knots downward, creating a net-like structure that cradles the bottle. The bottle should sit inverted in the holder with its mouth (and the feeder tube) pointing downward.
Adding color is where this design becomes genuinely customizable. Natural macramé cord can be dyed before construction, or colored cord can be incorporated into the pattern. Wooden beads threaded onto the cord before knotting add texture and visual interest. The result is something that looks considerably more expensive and intentional than its actual cost — typically under $10 in materials if you already have a suitable bottle.
The macramé holder also has a practical advantage: it can be untied and the bottle removed for thorough cleaning, then reassembled. For a feeder that needs regular maintenance (every 3 to 5 days for nectar changes, every two weeks for thorough cleaning with a dilute bleach solution), easy access matters.
Design 4: The Upcycled Container Feeder
What you need: A juice bottle or similar container for the reservoir, a shallow Tupperware or plastic container for the feeding base, a sharp knife or drill, red paint or tape, waterproof adhesive, wire or twine for hanging.
Time to build: Under an hour.
Skill note: This design involves sharp knife work and is not appropriate for children to build independently.
The container feeder takes a different approach than the inverted-bottle designs. Instead of relying on vacuum pressure to regulate flow, it creates a shallow reservoir that hummingbirds can access directly — closer in design to a saucer-style commercial feeder, which consistently attracts the highest percentage of hummingbird traffic in side-by-side comparisons.
The concept: modify the juice bottle to connect to the Tupperware container, which serves as the feeding basin. The bottle feeds nectar into the basin as birds drink from it, maintaining a consistent level. This requires cutting a hole in the Tupperware lid sized to accept the bottle mouth, and sealing the connection with waterproof adhesive to prevent leaks.
Paint the Tupperware container red, or apply red tape around the rim. The red color signals to hummingbirds that this is a nectar source. Without it, they may investigate but not understand where to feed.
This design is worth the additional complexity because saucer-style feeders are genuinely easier for hummingbirds to use. Their tongues, which lap nectar at roughly 13 to 17 times per second, work most efficiently when nectar is accessible at a shallow depth rather than drawn through a tube. The tradeoff is that open-basin designs require more frequent nectar changes in hot weather, since the nectar surface is exposed to air and heat.
Design 5: The DIY Ant Moat (Essential Accessory)
What you need: A small plastic bottle cap or bottle, a length of wire or cord, waterproof sealant, a small eye hook or loop for hanging.
Time to build: 15 minutes.
Strictly speaking, an ant moat isn't a hummingbird feeder — it's the device that sits above the feeder and prevents ants from accessing the nectar. But it belongs in any list of DIY hummingbird feeder projects because it solves one of the most common and frustrating problems with homemade feeders, and it's almost comically simple to build.
Ants follow the wire or cord that suspends your feeder, march down into the nectar, and contaminate it. Hummingbirds will abandon a feeder with ants in it. Commercial ant moats cost $5 to $10. A homemade one costs almost nothing.
The principle: a small cup filled with water sits on the hanging wire above the feeder. Ants cannot cross the water barrier. That's it. The entire mechanism is a small waterproof cup with a hole through the center for the hanging wire, sealed around the wire so the cup holds water without leaking.
Use a bottle cap with a small hole punched through the center, sealed around the wire with waterproof adhesive or plumber's putty. Thread the hanging wire through the hole before attaching it to your feeder. Fill the cap with water. Refill it when it evaporates — typically every few days in summer heat.
The ant moat adds both practical functionality and, with a little decoration, genuine charm to any feeder setup. Paint it red to match your feeder. Add a decorative bead above it on the wire. It's a small detail that signals you've thought through the whole system, not just the feeder itself.
Making Your Homemade Nectar: The One Thing That Matters Most
Every DIY feeder on this list is only as good as the nectar inside it. The recipe is straightforward and non-negotiable: 1 part white granulated sugar dissolved in 4 parts water. Boil the water, dissolve the sugar completely, cool to room temperature before filling feeders.
No red dye. Research indicates red dyes in commercial nectar can be harmful to hummingbird kidneys — and they're unnecessary, since the red color on your feeder does the attracting. No honey, which ferments rapidly and can cause a fatal fungal infection. No artificial sweeteners, which provide no calories and can cause hummingbirds to starve despite appearing to feed. White granulated sugar, water, nothing else.
Homemade nectar stays fresh for up to two weeks when refrigerated in a glass jar. Making a double batch — 2 cups water and ½ cup sugar — takes approximately four minutes from kettle to refrigerator and fills multiple feeders with enough left over for midweek refills. The cost works out to roughly $4 per month during peak season, compared to $47 per month for commercial nectar products during the same period. That's not a minor difference.
Positioning Your DIY Feeder for Maximum Visits
Building the feeder is only half the equation. Where you hang it determines whether hummingbirds actually find and use it.
Hang feeders at 4 to 5 feet high — this is the height range where hummingbirds are most comfortable feeding and where they naturally expect to find nectar sources. Position feeders within 3 feet of windows or more than 10 feet away; the danger zone for window strikes is 3 to 10 feet, where birds can build enough speed to cause fatal collisions.
Partial shade extends nectar freshness. Full sun accelerates fermentation, requiring more frequent changes. A location visible from inside the house — within comfortable binocular range — transforms the feeder from a yard fixture into a daily source of genuine pleasure.
New feeders often sit empty for days or even weeks. Hummingbirds are cautious about new food sources, and they need to discover your feeder on their own schedule. If you're in a region where hummingbirds are expected, put feeders out 1 to 2 weeks before their typical arrival window — May through September in most regions — and then wait. The first visit, when it comes, makes the wait feel entirely worthwhile.
Building your own hummingbird feeder isn't about saving money, though it does. It isn't about crafting for its own sake, though that's a legitimate pleasure. It's about understanding what these extraordinary birds actually need — reliable nectar, a safe location, a clean container — and providing it without the unnecessary complexity that commercial products add to what is, at its core, a beautifully simple relationship between a backyard and a bird.